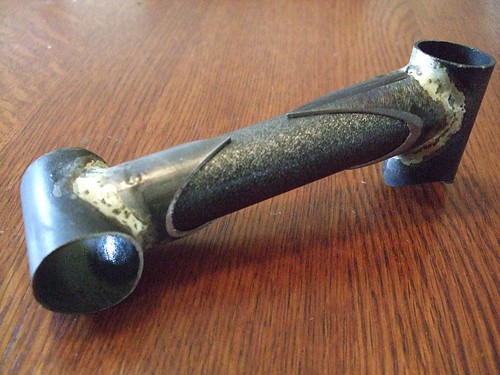
The lugged frame was on a bit of a hold while I waited for some shift lever bosses. Those just arrived today, and will be on the bike asap. In the meantime, I took some time to build a few tools and to do some destructive testing on a stem.
The tools will make their blog appearances as they are used, but consist of a shift boss jig and a canti boss/ rack mount/ bridge adjustable jig. I've had great luck just eyeballing and measuring these, but the tools should make set up a little quicker.
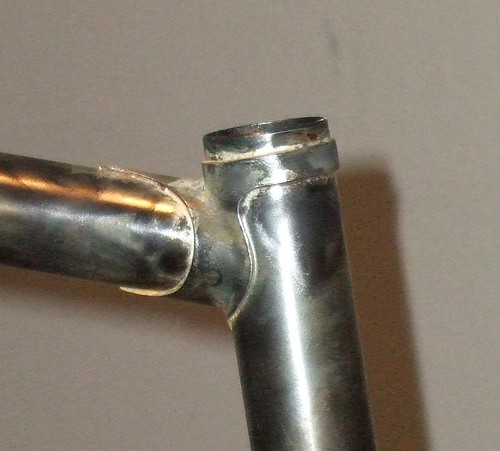
The stem was made with 4130 .035 tubing and was nickel silver brazed with only gasflux. I intentionally put this together sloppily to see what kind of results I could get. I started off putting it in my vise with a cheater bar on the quill. I could not get it to bend enough to take a set. After exhausting myself there, I proceeded to beat on it for a half hour with a 2 lb sledge hammer. While its nice and mangled, nothing "broke". After enough whacks, the tubes started to collapse in, but all of the brazing held.
This is GREAT!!! If you take a crash, you want the stem to spin on the steerer or at worst bend, but not snap off at the joint. While it might be a bit crooked, you can ride it home. I was very pleased with these bench test results.
Pleased with the success of this crude test I also started making a lugged stem. This is not a kit stem, but rather a quill with Quixotic made lugs in the constructeur style. Stay tuned to watch this develop!
Monday, April 28, 2008
Thursday, April 17, 2008
Depth
I have been going nut job bonkers lately with all my crappy frame pictures. The depth of field has been all off, and I have great pictures of crisp door jams with blurry frame details obstructing the view.
I'm a bit of a luddite, and have only relatively recently moved from a camera that works fine without a battery to a digital P&S (or POS depending on my frustration level).
Today, in a frantic button pushing session trying to change my ISO I discovered that my camera has a MACRO setting. Holy moly- I really should pay more attention to the owners manual (which I read).
To celebrate, here is my first successful macro shot showing the beginning stages of lug thinning.
*Etymology Trivia Points- Holy moly (first used by Capt. Marvel in 1943 as "holy moley") is a rhyming derivative of "holy mackerel", which was first used around 1803. True Luddites (1811) would have preferred the fish reference.
Tuesday, April 15, 2008
Head badges!
I have two working models of the new head badge. They are essentially the same graphic, but the background uses negative space a bit differently.
One is a bit more filled in with a positive sky and negative clouds:
The other has a negative sky with positive clouds:
I think I like the the second one a bit more. Thoughts?
Shiggy at mtbtires.com was kind enough to cut them for me out of some brushed aluminum vinyl I found. The vinyl has been a great way to do some quick and inexpensive prototyping before doing this in stainless (and maybe some in copper).
Unfortunately my camera battery died just as I was setting up to work on the current lugged road frame so I don't have very many process pictures. I did get the battery charged though, and will be picking up again now that most of the frame brazing is done. I'll leave you with a 10pm head lug picture though. The whole joints worth of silver was pulled in from the tip of the top tube point.
Sunday, April 6, 2008
Working Dog?
Nope- not a euphemism for my approach to bike building.
I'm talking about Charley, my 80lb lap/shop dog.
My friend Andrew has a great blogwith a focus on his vizsla's training progress as bird dogs. Vizsla's are a very pretty red hunting dog of medium build that seem to turn out as very eager working dogs.
Charley is a classic American pound pup- we picked him up as a small black rottweiler that quickly blossomed into a large black lab. I blame the unconquerable viral genes of the labrador. They could mate with chairs and produce black lab puppies.
Charley just had his third birthday, and after quite a bit of work, here he is executing a very distinguished point.
Currently he and my wife are working on his retrieve by rolling a squeaky ball back and forth on the couch. This afternoon he will be marking cats out of the living room window. We've put quite a bit of work in on this, and he can now do it flawlessly with zero hesitation.
On the bike front I am finishing up tube selection for fully lugged road bike. Stay tuned for developments.
Friday, April 4, 2008
When little tubes grow up...
... They become racks.
I've been working on a few rack projects from cast off 4130 tubing. We use a lot of this at work for supports and stock racks. I try to pick up bits that are over a couple inches long but to short for shop use. Every so often I end up with enough to crank out a rack platform. The image above is the feather shaped platform that became the rack on the (just completed) step through.
Take a look at the chain guard and new decals/ head tube badge prototypes.
This week was a long one at 46 bikes (hence the late blog update). At the end of the day, one must ask oneself "What is the best way to relax after another long day?".
By combining re-used materials with a love of bicycling, fire, art deco design and 80's Atari iconodulism to make a pretty neat-o small porteur-esque front rack.
This will be for my randonee bike, and I'm debating adding an integrated decaleur (bag mount). Since I don't have a bag yet, I may hold off and just make the support modeler in case I add one down the road.
Labels:
art deco,
atari,
chain guard,
custom rack,
ladies frame,
porteur,
randonee,
step through
Subscribe to:
Posts (Atom)